Buildings
Ten structures you build and three you rent, three levels each, on a 20 × 20 grid. Placement is free to change at any time, so the only decisions that stick are what you build and when you upgrade it.
All buildings at a glance
Tables scroll sideways on a narrow screen.
| Building | Needs | Max | Size | Cost | Build time |
|---|---|---|---|---|---|
| Headquarters | Lvl 1 | 1 | 2×2 | Granted free | Instant |
| Gold Mine | Lvl 1 | 5 | 1×1 | 100 gold · 50 materials | 5m |
| Power Plant | Lvl 1 | 3 | 1×1 | 150 gold · 75 materials | 5m |
| Material Depot | Lvl 2 | 4 | 1×1 | 200 gold · 50 energy | 7m 30s |
| Wall Segment | Lvl 2 | 50 | 1×1 | 50 gold · 25 materials | 1m |
| Training Yard | Lvl 2 | 4 | 2×2 | 400 gold · 250 materials · 75 energy | 8m |
| Barracks | Lvl 2 | 2 | 2×1 | 500 gold · 200 materials · 100 energy | 10m |
| Defense Turret | Lvl 3 | 10 | 1×1 | 300 gold · 100 materials | 5m |
| Motor Pool | Lvl 4 | 4 | 2×2 | 800 gold · 625 materials · 190 energy | 16m |
| Factory | Lvl 4 | 2 | 2×2 | 1,000 gold · 500 materials · 250 energy | 20m |
| Field Training Tent | Lvl 2 | 4 | 2×2 | 100 War Bonds / day | Instant |
| Field Barracks Tent | Lvl 2 | 2 | 2×1 | 100 War Bonds / day | Instant |
| Field Workshop | Lvl 4 | 2 | 2×2 | 100 War Bonds / day | Instant |
Every row above is built with resources and stands for good — except the last three. A tent is rented: it costs no resources, is standing the moment it is paid for, and comes down when you stop paying. Each has its own allowance, separate from the buildings it stands in for rather than a share of them. Tents have their own page, because how big they are and what happens when one lapses both need explaining — Training space.
Reading the construction menu
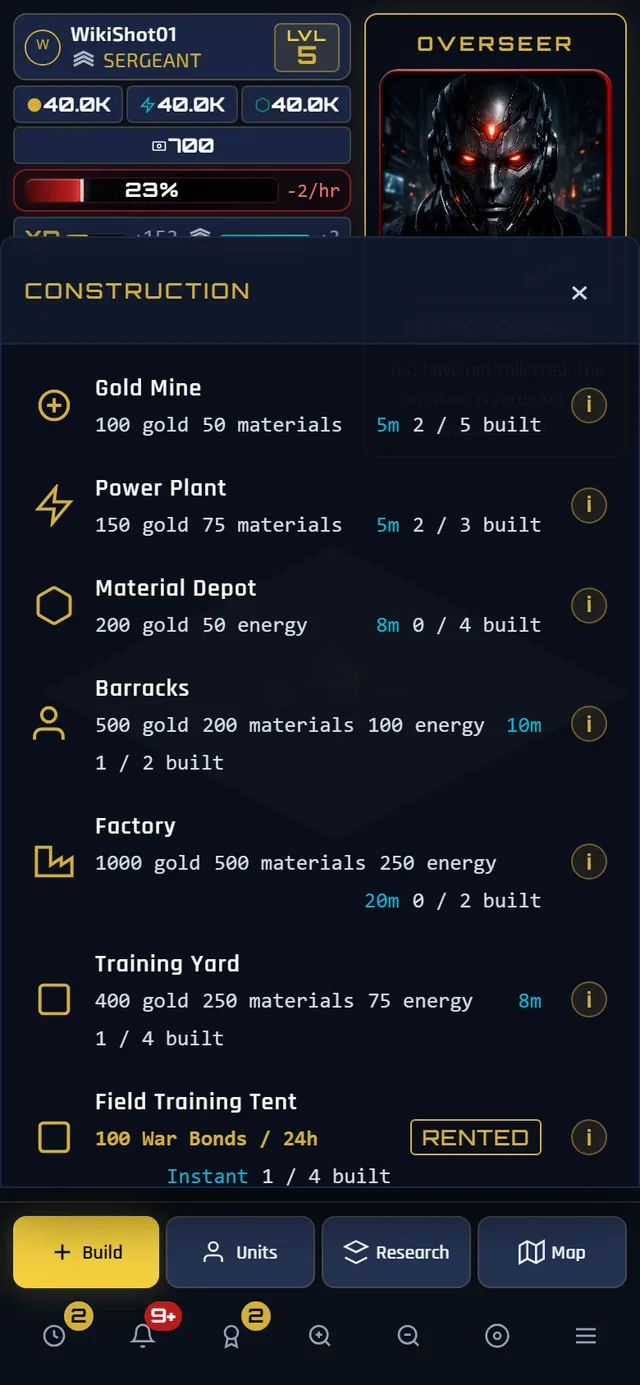
- The tally is always there, not just at the wall. A capped structure reads 2 / 5 built from the first one you raise, so you can see the ceiling coming rather than discovering it.
- Exhausted rows sink to the bottom and are marked MAX. They are not hidden — five is a number you should be able to check — but they stop occupying the top of a menu whose job is to answer "what can I do now".
- A greyed row says why. LVL 4 means your level does not reach it; a red cost means you cannot afford it; NEEDS ONE FIRST on a rented row means you do not yet own the structure it would be measured against.
- The info dot opens this page. Tapping it lifts the relevant entry below into a panel over the game, so you never have to leave a decision to look something up.
What each one is for
Headquarters
granted Your command structure, placed for you and impossible to build a second one of. It produces nothing. Upgrading it buys no production, no housing and no defence — but at an hour and then two hours it is one of the largest single XP awards in the game. Start it when you want a level, not when you want a stronger base.
Gold Mine
economy The cheapest income in the game and the one you want most of: gold is what everything is priced in. You may own 5. At level 1 each produces 50 gold per hour, so a full set of five is 250/hr before upgrades.
Power Plant
economy Energy, at 20/hr per plant, capped at 3 plants. Energy is the scarcest resource by production — a full set of three is only 60/hr — and it is what gates Barracks, Training Yards, Motor Pools, Factories, vehicles and most tier-2 research. Build all three early.
Material Depot
economy Materials, at 30/hr each, up to 4. Materials are the second half of nearly every construction bill.
Barracks
military Where infantry are trained — Infantry, Scouts and Heavy Infantry. It also houses a small standing garrison of 5 units at level 1, which is enough to train something before you can afford a Training Yard and not much more.
It runs one batch at a time. Two Barracks is two orders at once; one Barracks is one order and then a queue. Upgrading one takes it offline for the whole upgrade, so a player with a single Barracks cannot train at all while it is going up.
Training Yard
military Housing for troops, and nothing else — but housing is the hard cap on your entire army, and therefore on how much an expedition can carry. Level 1 houses 15; each upgrade doubles that. You may own 4. It trains nothing.
Housing is what limits the size of a gathering party, and the size of the party is what limits the load. Four Training Yards at level 1 house 60 units — sixty Infantry lift 3,000 between them. No number of Gold Mines comes close to that in a few minutes' work.
Factory
military Where vehicles are assembled — the Recon Drone, the Light Tank and the Battle Tank. It is the most expensive building in the game and takes twenty minutes. Like a Barracks it runs one order at a time, and like a Barracks it carries a small garrison as a courtesy: 5 vehicle bays at level 1, so unlocking vehicles does not immediately strand you behind a Motor Pool. See vehicles.
Motor Pool
military Hardstanding, fuel and fitters — a Training Yard for vehicles, and the same shape of building in every way that matters. It houses 15 vehicles at level 1, doubling per level, up to 4 of them. It builds nothing.
Its bays are a separate pool from troop housing and the two never mix. Nothing else in the game provides vehicle bays except a Factory and the rented Field Workshop, so if you intend to field vehicles at all, this is the building that decides how many.
Defense Turret
defence An automated emplacement: 300 health, 25 damage, range 5, one shot per second. Up to 10.
Wall Segment
defence 500 health for 50 gold and 25 materials, built in a minute, up to 50 of them. The cheapest health in the game per gold spent, and the cheapest XP.
Turrets and Walls have real statistics and cost real resources, but there is no base-attack system in the game yet — nothing currently shoots at your base. Build them because you want to, not because you are exposed. Spend on economy and housing first.
Field Training Tent
rented A requisitioned canvas drill tent, 2×2, standing in for a Training Yard. It houses troops and trains none. It costs 100 War Bonds for a 24-hour term, stands the instant it is paid for, and is worth as much space as your largest training building is worth today. Four of them, on top of your four Yards. Full details on training space.
Field Barracks Tent
rented A canvas drill hall, 2×1, standing in for a Barracks. It trains infantry, and is sized against your best Barracks alone. Same price, same term, two of them. This is the one that answers NO FACILITY and BUSY on an infantry row.
Field Workshop
rented A canvas assembly line, 2×2, standing in for a Factory. It assembles vehicles, and its space is vehicle bays, never bunks. Same price, same term, two of them, and it needs level 4 like the Factory it deputises for.
Telling the three tents apart
All three are pale canvas peaks with guy lines, ground pegs and no foundation — that is what "rented" looks like, and on a dark map they are the brightest things on it. What separates them is a mark painted large on both canvas slopes, so it reads whichever way the camera is facing:
- Rank stripes — three stepped chevrons, red. This one trains infantry: the Field Barracks Tent. It is also the only tent with a long narrow 2×1 footprint, so the plot alone gives it away before any paint does. There is a rifle rack against the skirt.
- A cog — a square ring with four teeth, purple. This one builds vehicles: the Field Workshop. It also carries a steel gantry hoist standing over an open drive-through end, which nothing else in the game does.
- A bunk — two rails between two posts, red. This one houses troops and makes nothing: the Field Training Tent. Gold appears once, on the requisition plate by the door.
The rule is simple enough to remember: the two tents that make something are marked for what they make, and the one that makes nothing is marked with a bed.
A building being upgraded is offline for the whole upgrade, so if both your Barracks are going up at once there is nothing left to train at; and a facility runs one batch at a time, so a single Factory means one order and then a queue. Either way the panel says so and offers you the tent right there, labelled RENT TENT or RENT WORKSHOP with its price beside it. It stands the moment you pay, and it is a second production line until it comes down.
Upgrades
Every building has three levels. An upgrade costs more than the original build did but roughly doubles what the building gives you, so once you have hit a building's cap the upgrade is the better purchase than nothing — it is simply not free.
Producers
| Building | Level | Output | Upgrade cost | Upgrade time |
|---|---|---|---|---|
| Gold Mine | 1 | 50 gold | — | — |
| 2 | 100 gold | 150 gold · 75 materials | 10m | |
| 3 | 200 gold | 225 gold · 115 materials | 20m | |
| Power Plant | 1 | 20 energy | — | — |
| 2 | 40 energy | 225 gold · 115 materials | 10m | |
| 3 | 80 energy | 340 gold · 170 materials | 20m | |
| Material Depot | 1 | 30 materials | — | — |
| 2 | 60 materials | 300 gold · 75 energy | 15m | |
| 3 | 120 materials | 450 gold · 115 energy | 30m |
Housing
| Building | Pool | Level | Houses | Upgrade cost | Upgrade time |
|---|---|---|---|---|---|
| Barracks | Troops | 1 | 5 | — | — |
| 2 | 8 | 750 gold · 300 materials · 150 energy | 30m | ||
| 3 | 16 | 1,125 gold · 450 materials · 225 energy | 1h | ||
| Training Yard | Troops | 1 | 15 | — | — |
| 2 | 30 | 600 gold · 375 materials · 115 energy | 25m | ||
| 3 | 60 | 900 gold · 565 materials · 170 energy | 50m | ||
| Factory | Vehicles | 1 | 5 | — | — |
| 2 | 8 | 1,500 gold · 750 materials · 375 energy | 1h | ||
| 3 | 16 | 2,250 gold · 1,125 materials · 565 energy | 2h | ||
| Motor Pool | Vehicles | 1 | 15 | — | — |
| 2 | 30 | 1,200 gold · 940 materials · 285 energy | 25m | ||
| 3 | 60 | 1,800 gold · 1,405 materials · 430 energy | 50m |
Both scaling buildings work the same way: an upgrade always adds more places than a second building at the same tier would, and costs less. A Training Yard upgrade is 600 gold to add fifteen places, against 400 gold for a fresh yard that adds fifteen but also eats a 2×2 footprint and eight more minutes. Upgrade before you hit the cap.
Note the word active in the table above. A building under upgrade is offline, and an offline building houses nobody — so upgrading your only Training Yard drops your troop cap by 15 for the whole upgrade and you cannot train anything until it finishes. The same is true of a Motor Pool and your vehicle bays. Nothing is lost; you are simply stuck. Training space covers the three ways through it, including the rented Field Training Tent.
Everything else
| Building | Level | Health | Upgrade cost | Upgrade time |
|---|---|---|---|---|
| Headquarters | 1 → 2 | 1,000 → 1,500 | 1,125 gold · 525 materials · 225 energy | 1h |
| 2 → 3 | 1,500 → 2,000 | 1,690 gold · 790 materials · 340 energy | 2h | |
| Defense Turret | 1 → 2 | 300 → 450 | 450 gold · 150 materials | 10m |
| 2 → 3 | 450 → 600 | 675 gold · 225 materials | 20m | |
| Wall Segment | 1 → 2 | 500 → 1,000 | 75 gold · 40 materials | 2m |
| 2 → 3 | 1,000 → 1,333 | 115 gold · 55 materials | 4m |
Rules worth knowing
- The grid is 20 × 20 and never fills up. Even every building at its maximum count is a small fraction of it. Space is not a constraint; resources are.
- Moving is free and instant. Only completed buildings can be moved — which includes a rented tent, so the spot the game picks for it is not final.
- A rented structure is placed for you. Renting from the construction menu drops it on the first free square that fits, because a player buying one is usually mid-emergency. Move it afterwards if you care where it stands.
- Cancelling a construction refunds half. There is no demolish, and no way to recover a building once it is finished.
- Construction research helps everything. The construction branch cuts build and upgrade times by up to 40% in total. See research.
- Upgrades award more XP than fresh builds. A Factory or HQ upgrade to level 3 pays 540 XP; see levels and ranks.